I was looking through some topics on forums recently and there is a question being asked that has piqued my interest,
“Why does my sandpaper keep falling off my orbital sander? I have tried all the different brands of sanding discs but nothing seems to work.”
Now, this seems to be a fairly common issue and if this problem is affecting you, you have landed in the right spot. I’ve done my research and have found what is more than likely causing your sandpaper to fail and fall off your orbital sander in the first place.
The problem causing your sanding disc to fall off is due to the random orbital sanders backing pad failing, not the sandpaper itself. Improper sanding techniques can cause excess heat which will melt the plastic hooks on your orbital sanders backing pad. Once the hooks have melted, they can no longer hook the disc properly and it will cause the disc to not stick to the sander and fall off.
Now that you know what causes the sandpaper to not stick, it’s time to do something about it. Keep reading as we dive into solutions and some helpful tips to eliminate this pesky but persistent issue.
Alternate Reason Your Sandpaper Will No Longer Stick (A Quick Note)
This entire article is dedicated to identifying damaged hooks on your orbital sanders’ backing pad and correcting the techniques that caused it to happen in the first place. The reason for this is that this is usually the area that can throw a hobbyist woodworker for a loop. It also has the most opportunity for a woodworker to grow and learn new techniques.
There is however another possible alternative that can and should be investigated before blaming the hooks on your backing pad.
It is possible that your backing pad has just become clogged with sawdust and needs to be cleaned out. Remove your sanding disc and visually inspect the sander’s backing pad for any saw dust preventing the hook and loop from doing its job. If there is any debris, simply clean it off.
To clean your hook and loop, there are a few methods. Most of them deal with combing out the debris. The best suggestion I have found yet is to use a nit comb that you would purchase from the local pharmacy. You can see David’s response here if you want to check out this technique.
How to Check Your Orbital Sanders Backing Pad for Damage
The first thing to do if you start seeing your sanding disc fly across the shop like an alien saucer is to inspect the backing pad. You will be looking for any debris that may have clogged too many of the hooks.
Visual Inspection for Saw Dust
If you notice sawdust on the backing pad, simply clean it off as discussed in an earlier section. As soon as you clean your backing pad, you can get back to your project. However, if your backing pad was clean upon inspection or if cleaning the backing pad hasn’t solved your problem, we will need to investigate further.
Visual Inspection for Damaged Hooks
For this step, it will be helpful if you have a magnifying glass and a good light. This is not required but will make this step much easier. Once you are ready, begin inspecting the hooks on the backing pad. The hooks should look something similar to the photo below.
The hooks consist of plastic and resembles a fish hook. The style of hooks is dependent on the manufacturer but they all follow the same principle.
They have a piece of plastic extended up from the pad that has a ‘hook’ at the end. This is the piece that will grab onto the little fibers that are located on the back of your sanding pad, the ‘loop’ side.
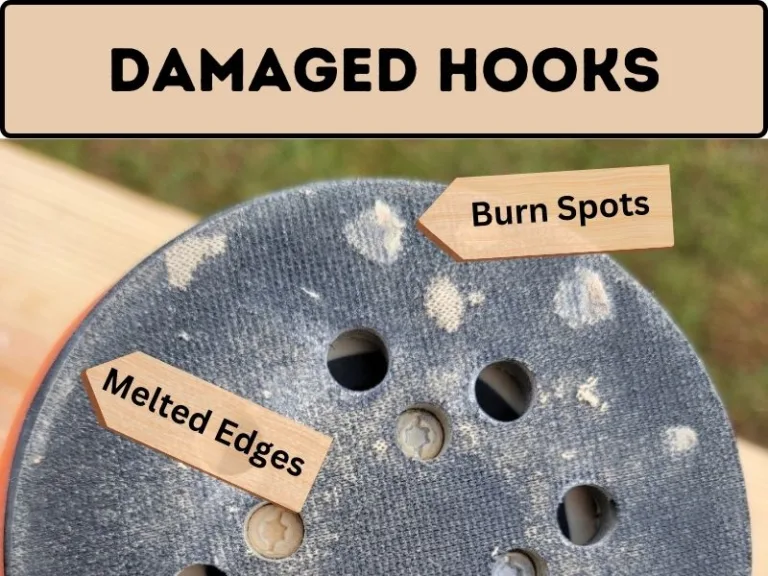
What you want to be on the lookout for are any signs of melted hooks. Pay attention to the outside edges of the backing pad as they are particularly susceptible to melting. If you see melted hooks, you will want to keep reading as we show you how you can not only fix it, but prevent it from happening again.
The hooks melt when there is excess heat generated from improper sanding. When too many of the hooks melt, the spinning force of the orbital sander becomes too great and the sandpaper can no longer stay attached to the sander, sending your discs flying off into oblivion.
Band-aid Solutions
Backing Pad Replacement
If you see that your backing pad has signs of melted hooks, there are a few options you can pursue to remedy the issue. The first thing you will need to do regardless of which direction you decide to go is to order a new backing pad.
A new backing pad is relatively inexpensive and will run you about 10-15 bucks. For example, I can get a 2 pack for my RIDGID Random Orbital Sander for about 30 dollars. If your sander has seen a lot of use and the backing pad just wore out naturally then this solution alone will be fine. However, if the sander is relatively new and the backing pad is already worn out from melted hooks, you may want to keep reading to help prevent this from happening again.
If you continue to sand with the new backing pad in the same way that you were sanding with the old backing pad, it won’t be long until you are replacing it yet again. This is because more than likely your technique is to blame for the premature wear.
Don’t fret, we will dive into some tips in the next section that you can take with you into the shop and help improve your sanding game.
Hook and Loop Protector Pad
If you can’t seem to stop destroying your backing pad, no matter what you do then this might be the route you want to go. You can purchase a protector pad that fits between your sanding disc and the backing pad. The protector pad takes the brunt of the heat and wear.
This means that instead of destroying a $15 backing pad, you instead have only damaged a $5 throwaway pad that is easily replaceable. Click here to check out a protector pad I found that fits a 5″ orbital sander if this is an item that your interested in.
3 Tips for Preventing Sandpaper from Falling Off
This is the section that gets into the techniques and tips you can start implementing to help avoid the problem altogether. The main goal for all of these tips is to prevent generating too much heat. Too much heat kills the plastic hooks on your sander.
Keep Moving
During sanding, you need to make sure you don’t hold the sander in the same spot for too long. The longer you keep the sanding disc spinning in one spot, the more heat you will generate. This heat transfers through the sanding disc and reaches the hooks on your backing pad. Generate too much heat and your backing pad is toast.
Just keep the sander moving at a smooth but slow pace. You don’t want to go too fast when sanding because you will get uneven wear on the wood and could potentially create swirls, but going too slow will destroy the backing pad.
You should aim for about 1″ per second. This is a commonly accepted speed when using a random orbital sander.
Don’t use Excess Pressure
Pressing down on your sander too hard can have some detrimental effects on your sander. The excessive force will create more friction as your sander spins at about 12,000 orbits per minute, and can end with melted hooks.
Make sure you are just using the weight of the tool and very slight pressure on the sander as you move across the workpiece. You want to let the sander do the work.
If you find yourself leaning into your orbital sander to get satisfying results, it could be a sign that you need to change your sanding disc. Click here to check out our other article on how to know when to change your orbital sanders’ sanding disc.
Keep Sander Flat
When sanding it can be tempting to turn your sander up on its edge to get more aggressive material removal on a specific area. I know I am guilty of this because it seems to work well for those stubborn areas. However, doing this will generate a lot of heat on one specific edge of your sanders backing pad.
Typically the heat is dissipated through the whole diameter of the sanders backing pad, but when you focus the sanding on the outer diameter, the heat won’t be able to dissipate as easily. This will cause the outer edge to heat up.
If you don’t keep your sander flat the outside edge of the orbital sanders backing pad is particularly susceptible to having the hooks melted.

