A table saw is a staple in almost all woodworking shops, all the way from the hobbyist to the professional. If you are new to woodworking or are just thinking about adding this amazing tool to your arsenal, you are probably wondering when you should use your table saw.
A table saw is most commonly used to make precise cuts along the grain of a board also known as ripping. They can also be used to make other types of useful cuts such as; miter cuts, beveling edges, and cutting grooves.
Yes, table saws excel at cutting long boards with a high amount of precision, but there are quite a few uses of a table saw that can benefit almost every woodworker. We will look at 6 of the most common scenarios in which a table saw is used.
Common Scenarios Where You Can Use a Table Saw
Table saws are very versatile tools, and in my opinion, they should be one of the first things you add to your shop when you start woodworking. This was the route I went when I started woodworking, and it worked out great.
I had very little money to invest in a whole shop full of tools so I had to pick just a few, and a table saw was one of those tools. Let’s dive into some scenarios where you can use your table saw in the shop to see just where it can come in handy.
1. Ripping a Board (Cutting Along the Length of the Grain)
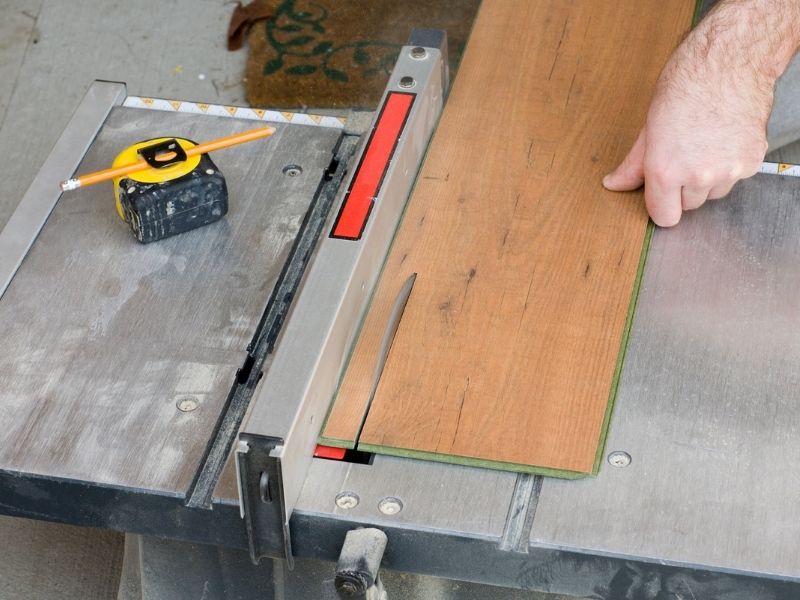
The most common scenario and where the table saw shines, is when you need to cut a board along the length of the entire board to get it to size. This is called ripping a board and will almost certainly be required at some point in a project.
The table on the table saw gives a large surface area for you to rest the board on as you push it across the saw blade. There are not many other contenders when it comes to successfully ripping a board, a table saw will be a must in this scenario.
2. Miter Cut (Cutting Along the Width of the Board, Against the Grain)
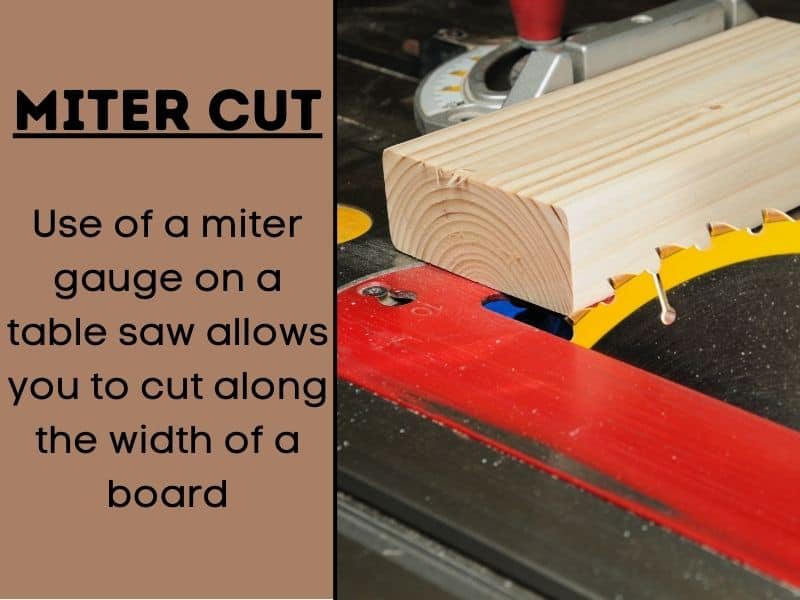
A miter cut is when you cut a board across the width and is usually a much shorter distance than when ripping a board. For this reason, a miter saw is usually the go-to for this, but it doesn’t have to be.
Most table saws come with a miter gauge that will allow you to cross-cut a board on your table saw. This is what makes a table saw one of my favorite tools in the shop, just because of its extreme versatility.
3. Beveling an Edge (Cutting the Board at an Angle)
Let’s say you want to add a bevel to the edge of the board. There are a few ways to accomplish this. You can use a miter saw, a router, or you guessed it, a table saw.
I can’t say with certainty that every table saw has this option, but all the ones I have dealt with have the ability to place the blade at an angle. This allows you to put a beveled edge along the length or width of the board.
This is a job that would be suited for a router table in most cases, but not all. If all you have is a table saw, it can definitely get the job done.
4. Cutting a Rabbet
A rabbet cut is a useful joinery technique that involves cutting a recess in the board along the edge. Two tools can be used for this; a router and a table saw. A router can make your life much easier when cutting a rabbet but many people just use a table saw.
By setting the depth to the correct height you can create a recess in your board. The downside to using a table saw over a router, is that with a table saw you can only cut the width of the blade. It will require several subsequent passes to get the rabbet to the correct width.
On the other hand, a router may also require more passes but not nearly as many. If you only have a table saw, you can cut a rabbet it just takes more time and requires more setup.
5. Cutting a Groove
A groove is essentially the same technique as a rabbet cut, with one significant difference. The groove is cut through a point inside of the board and not on the edge like with a rabbet.
Just like rabbets, they can be used for joinery, but also are useful when creating functional furniture. For example, a groove can allow your project to capture a door, leaving it locked into the workpiece but also allowing it to glide along the groove itself.
A router would be my go-to for this type of cut, but that doesn’t mean that is the only way. It can be done with a table saw, but similar to a rabbet, it will require more setup and time.
6. Cutting Plywood to Size
Most plywood that you purchase comes in some standard sizes, with the most common size coming in the 4′ x 8′ range. This means, that you will need to cut it down to your desired size to use for your project.
The large table on a table saw is going to be very handy to get this large sheet of plywood to size. It can be done through other methods, such as with a guide and a circular saw. However, if you want to create a precise cut, you are going to want to use a table saw. This is where you will have the most control and is the recommended way to cut plywood to size.
The only caveat is if you have a small table saw, and a large sheet of plywood it can be difficult to perform this cut (ask me how I know). The use of a buddy, an extended table, or even cutting the plywood to a manageable size first with a circular saw may be your best bet.
When Can You NOT Use a Table Saw?
As you might have guessed from the previous section, table saws are EXTREMELY versatile. It is one of my favorite tools in the workshop for this reason. However, they do have their limitations.
A table saw can not make curved cuts. If you try to turn the workpiece as you are feeding it through your table saw you are going to be in for a bad time.
If you begin to turn a board as you push it through the table saw, the wood will get caught on the board on its upstroke (as the teeth are coming up from the table). This is a kickback scenario and could be pretty dangerous. The board should be held straight at all times in a table saw to prevent this.
Other things to be avoided are cutting hard metals and plastics. A table saw can cut softer metals such as aluminum, IF you are using the correct blade. The same blade you use for wood will not work for aluminum so be aware of that.
Conclusion
A table saw can be used in a whole slew of scenarios and is an extremely valuable tool in the workshop. They are capable of performing cuts in several scenarios; ripping a board, crosscutting a board, beveling an edge, cutting joinery (rabbets and grooves), and getting plywood down to precise sizes.
Just to be clear, you can use a table saw for all of these cuts, but that does not mean that it is the best tool you can use for all of them. If there is another tool that will work better, then it is best to go that route. With experience you will begin to get a feel for what tool works best in different scenarios.